


Snowflake is a cloud data platform that enables organizations to store, analyze, and share data securely.
With this integration, you can connect to your Snowflake data warehouse and import data directly into Clay.
Connecting to Snowflake
When connecting your Snowflake account to Clay, you can choose between two authentication methods:
- Key-pair authentication (recommended): Uses a private key for secure authentication. This is the preferred method for enterprise teams. See Snowflake's key-pair authentication documentation for a guide to generating and configuring keys.
- Username and password: Traditional authentication method. Note that Snowflake is deprecating this method in favor of key-pair authentication.
Setting up key-pair authentication
Key-pair authentication requires an RSA key-pair. If you haven't already generated your keys, refer to Snowflake's key-pair authentication documentation for detailed instructions.
When setting up key-pair authentication, you'll need to provide:
- Connection name: A name to identify this connection in Clay.
- Username: The username tied to your private key.
- Private key: Upload your Snowflake private key file (.p8), or drag and drop it into the field.
- Private key passphrase: The passphrase for your private key, if applicable.
- Account: The account identifier for your Snowflake instance. This can either be an account ID or a full URL (e.g., NHDCQCP-SBB20777). For detailed instructions on how to find your account identifier, refer to the Snowflake documentation.
- Role (optional): The role to assume when connecting to Snowflake.
- Database (optional): The name of the database to connect to in Snowflake. If not specified, you'll be prompted to enter it when setting up a Snowflake enrichment.
- Schema (optional): The schema to connect to in Snowflake. If not specified, you'll be prompted to enter it when setting up a Snowflake enrichment.
- Warehouse (optional): The warehouse to use for queries in Snowflake. If not specified, you'll be prompted to enter it when setting up a Snowflake enrichment.
- Use static IP (optional): Enable this to ensure that the action runs from the same IP address, which can be useful for allow-listing.
Setting up username and password authentication
If your organization uses Okta, enter your Okta URL (e.g., example.okta.com) to ensure the integration functions correctly.
Creating a table with Snowflake
- In a workbook, click
+ Addat the bottom. - Search for
Snowflakeand select from the results. - In the modal, you will be asked to
Select Snowflake account.- If you haven't already connected your Snowflake account, click
+ Add accountand select your authentication method.
- If you haven't already connected your Snowflake account, click
Source Import from Snowflake
You can use Snowflake as a source for a new or existing table.
Inputs
- Snowflake account ID
- Database name
- Schema
- Table name
- Snowflake warehouse
- Role (optional)
Enriching data with Snowflake
- While in a Clay table, click
Add enrichmentand search forSnowflake. - Under
Integrations, select one of the Snowflake options. - In the modal, you will be asked to
Select Snowflake account.- If you haven't already connected your Snowflake account, click
+ Add accountand select your authentication method.
- If you haven't already connected your Snowflake account, click
Action Insert row
Insert a row into a Snowflake database.
Inputs
- Snowflake account ID
- Database name
- Schema
- Table name
- Snowflake warehouse
- Role (optional)
Action Lookup row
Check if a row exists in your Snowflake database.
Inputs
- Snowflake account ID
- Database name
- Schema
- Snowflake warehouse (optional)
- Role (optional)
- Query: The raw SELECT SQL query to run.
Action Upsert row
Upsert a row into a Snowflake database using a single field as a unique identifier. If the identifier exists, the row will be updated. If not, a new row will be created.
Inputs
- Snowflake account ID
- Database name
- Schema
- Table name
- Snowflake warehouse
- Role (optional)
Action Update row
Update a row in a Snowflake database using a single field as a unique identifier. If the identifier exists, the row will be updated. If not, a new row will be created.
Inputs
- Snowflake account ID
- Database name
- Schema
- Table name
- Snowflake warehouse
- Role (optional)
Run settings
- Auto-update
- Only run if: The enrichment will only run if conditions are met. (Learn more about conditional formulas here!)
Importing Snowflake data into Audiences
Clay Audiences supports importing data directly from Snowflake using a SQL query, letting you bring in product usage signals, website analytics, or any other warehouse data and layer it alongside CRM records and Clay-sourced contacts — all deduplicated around a shared identifier like company domain.
Setting up key pair authentication
Clay uses Key Pair Authentication for Snowflake. You'll upload a private key file (.p8) to Clay, and assign the matching public key to your Snowflake user.
If someone on your team has already set up the Snowflake connection and shared the .p8 file with you, skip ahead to Connecting in Clay.
To generate a new key pair, run the following commands in your Terminal (not in Snowflake):
openssl genrsa 2048 | openssl pkcs8 -topk8 -nocrypt -out snowflake_key.p8openssl rsa -in snowflake_key.p8 -pubout -out snowflake_key.pub
This creates two files: snowflake_key.p8 (your private key) and snowflake_key.pub (your public key). Treat the .p8 file like a password — do not share it openly.
Next, extract the public key as a single line (Snowflake requires it without line breaks):
cat snowflake_key.pub | grep -v"PUBLIC KEY" | tr -d'\\n'
Assign the public key to your Snowflake user by running this in a Snowflake worksheet:
ALTERUSER YOUR_USERNAMESET RSA_PUBLIC_KEY='paste_the_single_string_here';
Move the private key somewhere easy to find for the next step:
cp ~/snowflake_key.p8 ~/Downloads/snowflake_key.p8
Connecting in Clay
- In your Audiences workspace, navigate to the
CompaniesorPeopletab and clickAdd data. - Click
Add source→ search forSnowflake→ selectImport from Snowflake. - Click
+ Add accountand fill in the connection fields. - Finding your Account Identifier: In Snowflake, click your name or initials in the bottom-left corner, then click
View account details. Copy the Account Identifier — it will look something likeABCDEFG-XYZ12345. - Click
Test Account and Save.
Writing your SQL query
After your account connects, Clay prompts you to enter a SQL query. This determines exactly which data is imported into Audiences.
SELECT    domain,
    company_name,
    total_sessions,
    last_session_at,
    trial_status,
    engagement_score
FROM your_database.your_schema.your_table_or_view
Any valid SELECT works — tables, views, joins, and aggregations are all supported. Two things to keep in mind:
- Use fully qualified table names (
DATABASE.SCHEMA.TABLE). Snowflake doesn't always default to the database and schema you expect based on your connection settings. - Test your query in a Snowflake worksheet first to confirm it returns the rows you expect before connecting it to Clay.
Click Test to preview results, then click Continue.
Configuring Import sync
Once your source is connected, toggle on Import sync to keep your Audiences data current automatically.
When enabled, Import sync runs:
- Incremental imports every 15 minutes — picks up new or changed records
- A full sync once a week — refreshes all data
You can also trigger a manual sync at any time from the source settings, which is useful when testing.
To check sync status or update settings, click Add data in your Audiences workspace, find the Snowflake integration, click the ⋯ menu, and select Settings.
.webp)
Setting a unique identifier
Select the field that uniquely identifies each record in your Snowflake data. Clay uses this to determine whether an incoming row should create a new Audiences record or update an existing one. For company data, domain or work_email_domain are common choices.
Configuring Import record matching
Import record matching lets Clay deduplicate records across multiple sources. For example, if you're importing from both Snowflake and Salesforce, matching on domain ensures a single company row reflects data from both.
Click Edit next to Import record matching (optional), then:
- Choose an alias field (e.g.
Domain) underWhen. - Map that alias to the corresponding field in each connected source under
In. - Clay will merge records where the alias values match exactly.
.webp)
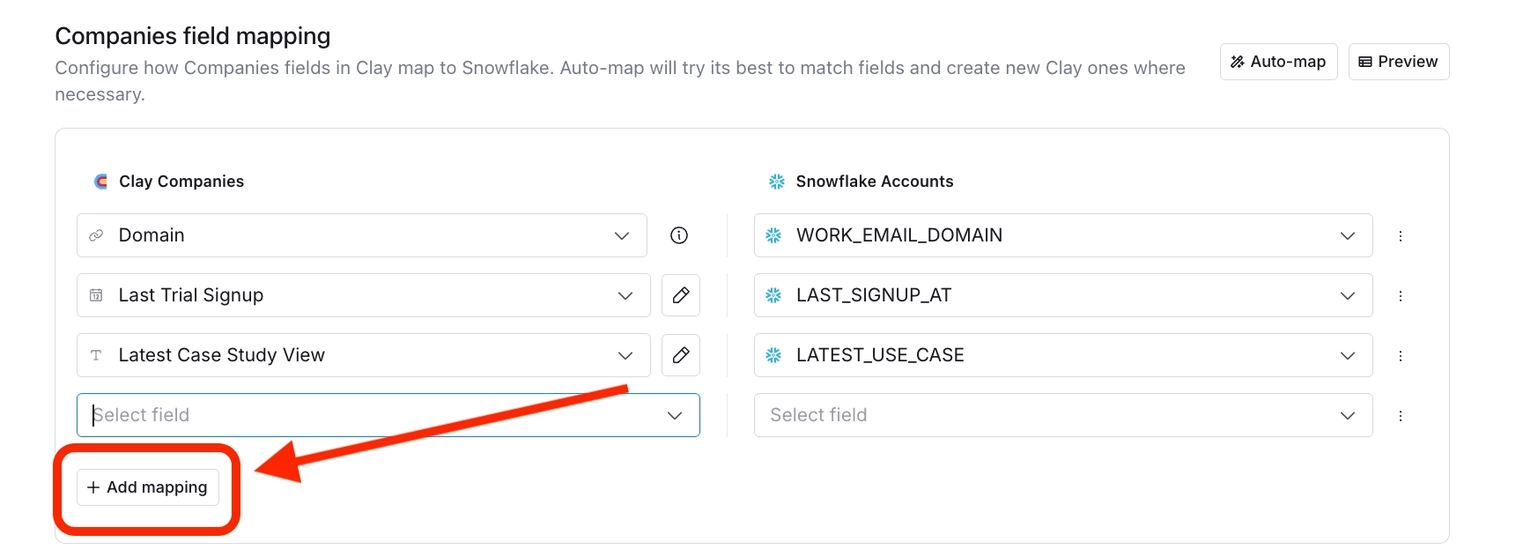
Mapping fields
After your query runs, Clay displays the columns it pulled in and lets you map them to Audiences fields.
- Click
Auto-mapto automatically match Snowflake columns to existing Clay fields. - To add additional mappings, click
+ Add mapping. If the destination Clay field doesn't exist yet, selectCreate field, choose a field type (Text, Email, URL, Number, Date, or Checkbox), and name it.
Explore other docs
Other popular resources
Join a cohort, learn Clay fast!
The faster way to master Clay. Sign in if you're enrolled in a cohort (current or past) or apply!
Hire GTME Talent
Find and connect with GTM talent who've demonstrated expertise in building advanced workflows