


Send table data in Clay lets you route records between tables, making multi-table setups simple to manage and intuitive to use.
When to use Lookup Rows vs. Send Table Data
Both Lookup Rows and Send Table Data move information between tables, but they work in opposite directions and serve different purposes.
Use Lookup Rows when...
Lookup Rows pulls data from another table into your current table based on matching criteria. It's non-destructive and doesn't modify the source table.
- You need to enrich your current table with data that already exists in another table
- You want to check if a record exists in another table without modifying anything
- You need to count or aggregate rows that share a trait (e.g., how many people work at each company)
- You want to reference data from a central table (like a pricing list, messaging library, or Do Not Contact list)
- You're working with static reference data that multiple tables need to access
Learn more about Lookup Rows →
Use Send Table Data when...
Send Table Data pushes data from your current table into another table. It creates or updates rows in the destination table.
- You need to route or segment your data into different tables based on logic or filters
- You want to flatten lists into individual rows (e.g., turn a list of 5 people into 5 separate rows)
- You need to merge data from several tables into one consolidated table
- You want to separate concerns across multiple tables (e.g., companies in one table, people in another)
- You're building multi-stage workflows where each table handles a specific step in your process
Sending table data
To send data from one table to another:
- While in a table, click
Exports→Send table data. - Select the destination table.
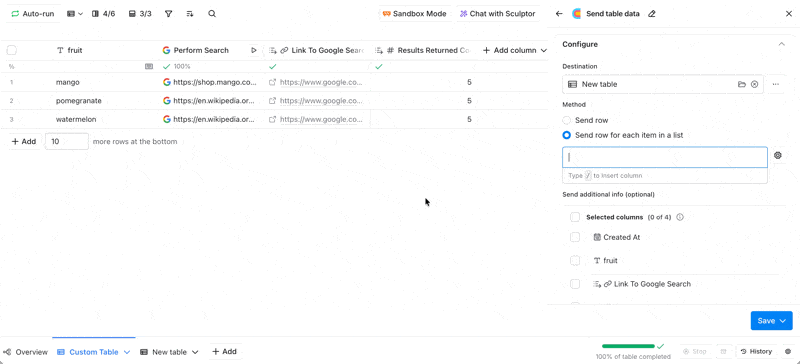
- Choose the method:
Send row: Choose which columns to send as a row to the other table.Send row for each item in a list
- Select data to send over.
- Click
Save.
Using Send row
Send row sends each row as-is to another table. Use it to filter or segment data, or to separate logic across multiple tables. It transfers specific columns, keeping your data aligned and reducing manual entry. Any extracted basic field can be sent to the destination table using the checklist selectors.
Additionally you can:
- Send nested data from the parent table. (This is useful when you want to avoid extracting basic fields from an action column's output.)
- Rename any field in the destination table using the destination column dropdown.
Using Send row for each item in a list
Each cell can hold a list of items—like a list of people found at a company. To turn each item in that list into its own row in another table, use Send row for each item in a list.
This is useful for flattening lists. For example, if you find multiple people at a company, you can send each person as a separate row in the destination table. This method always creates a new row for each item.
You can also select additional data to send along with the flattened list, just like with Send row.
Advanced settings
Update existing rows on re-run
When re-running, updates the matching row in the destination table instead of creating a new one.
Auto-extract new columns
Automatically creates new columns in the destination table for any that don't already exist.
Auto-map existing columns
For existing columns in the destination table, updates the formula to reference the configured source data. For columns without a formula (e.g., manually entered data or CSV imports), the formula won't be updated to avoid overwriting data.
Mapping table data in the destination table
When you send data to a destination table, it appears in the leftmost column as "rows from: [source table name]". The data is stored within this cell and needs to be extracted into individual columns to use it in your workflow.

To manually map data from the source column to columns in the destination table:
- Click into the source cell (the "rows from: [source table name]" cell).
- Hover over any field you want to extract.
- Click
Add to column. - Choose to either:
- Create a new column: Name the column and click
Create column. - Map to an existing column: Select an existing column from the dropdown.
- If the column doesn't already have a formula configured, you'll see a warning about the risk of overwriting data. If the column is empty, it's safe to proceed.
- Create a new column: Name the column and click
Repeat this process for each field you want to extract into its own column.
Guide: Merging two tables with Send table data
Best practices & troubleshooting
- There can be a maximum of 20 tables connected. This includes tables across workbooks.
- Data can only be sent in a linear direction (A → B → C). In other words, loops are not possible (A → B → C → A).
- If you want to receive data in the table you're also sending data from, use one of these other actions:
Lookup Multiple Rows in Other TableLookup Single Row in Other Table
- If you want to receive data in the table you're also sending data from, use one of these other actions:
Explore other docs
Other popular resources
Join a cohort, learn Clay fast!
The faster way to master Clay. Sign in if you're enrolled in a cohort (current or past) or apply!
Hire GTME Talent
Find and connect with GTM talent who've demonstrated expertise in building advanced workflows