


Message drafting overview
Write personalized message sequences with AI, conditionals and more.

Message drafting overview
The Message drafting feature streamlines the process of creating personalized, dynamic messages for export to your chosen sequencer.
This is particularly useful for automating outbound campaigns, such as sales outreach, as well as creating personalized intake messages for signups.
Steps to using the message drafting feature
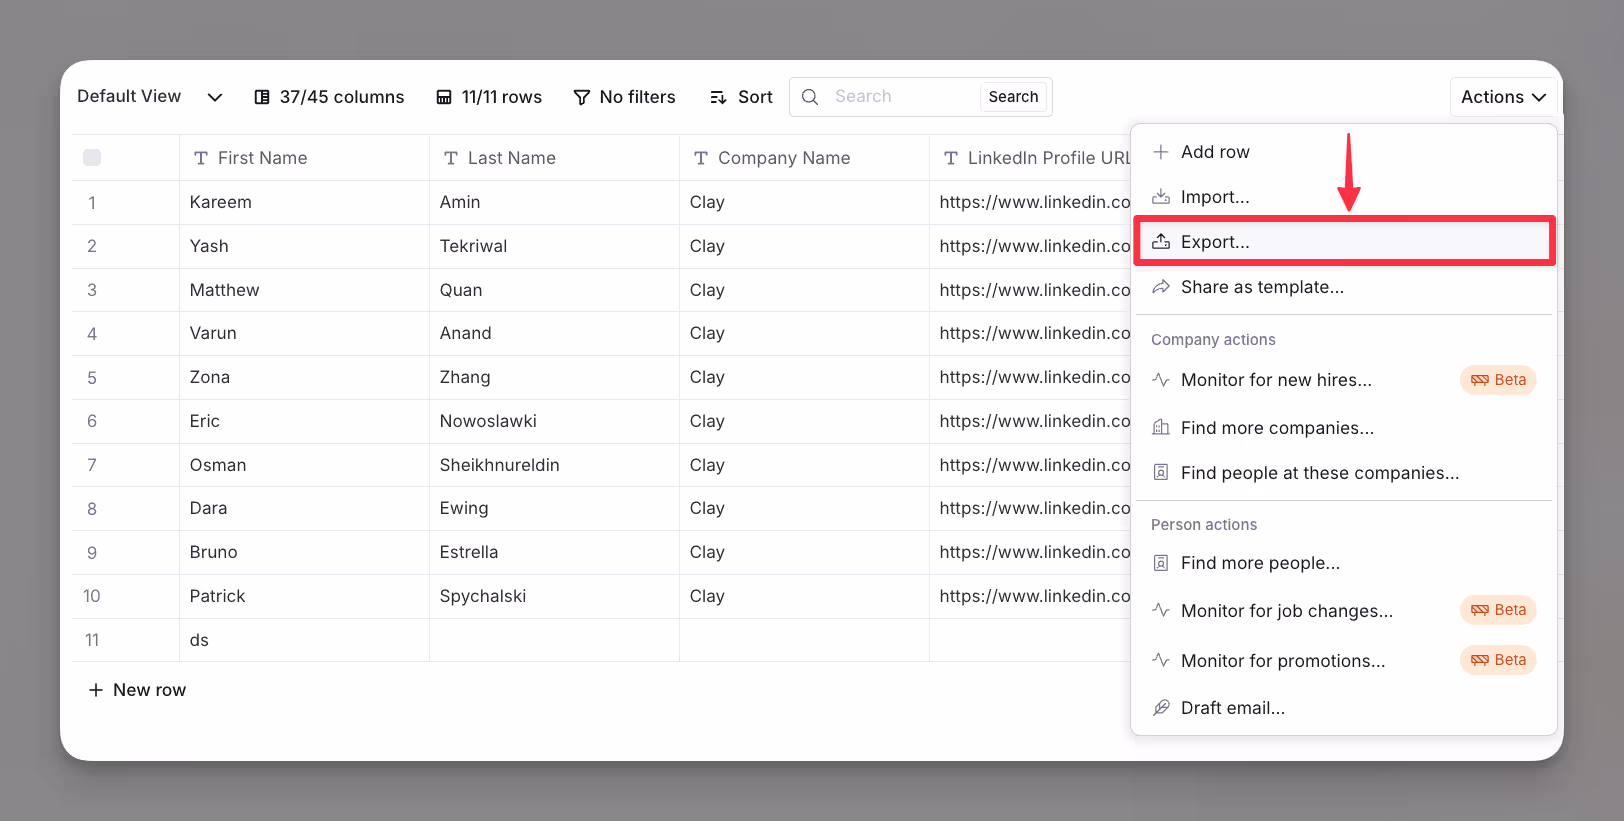
Step 1: Open message drafting feature
Access the message drafting tool through the export actions menu: Actions > Export > Export Messages to Sequencer.
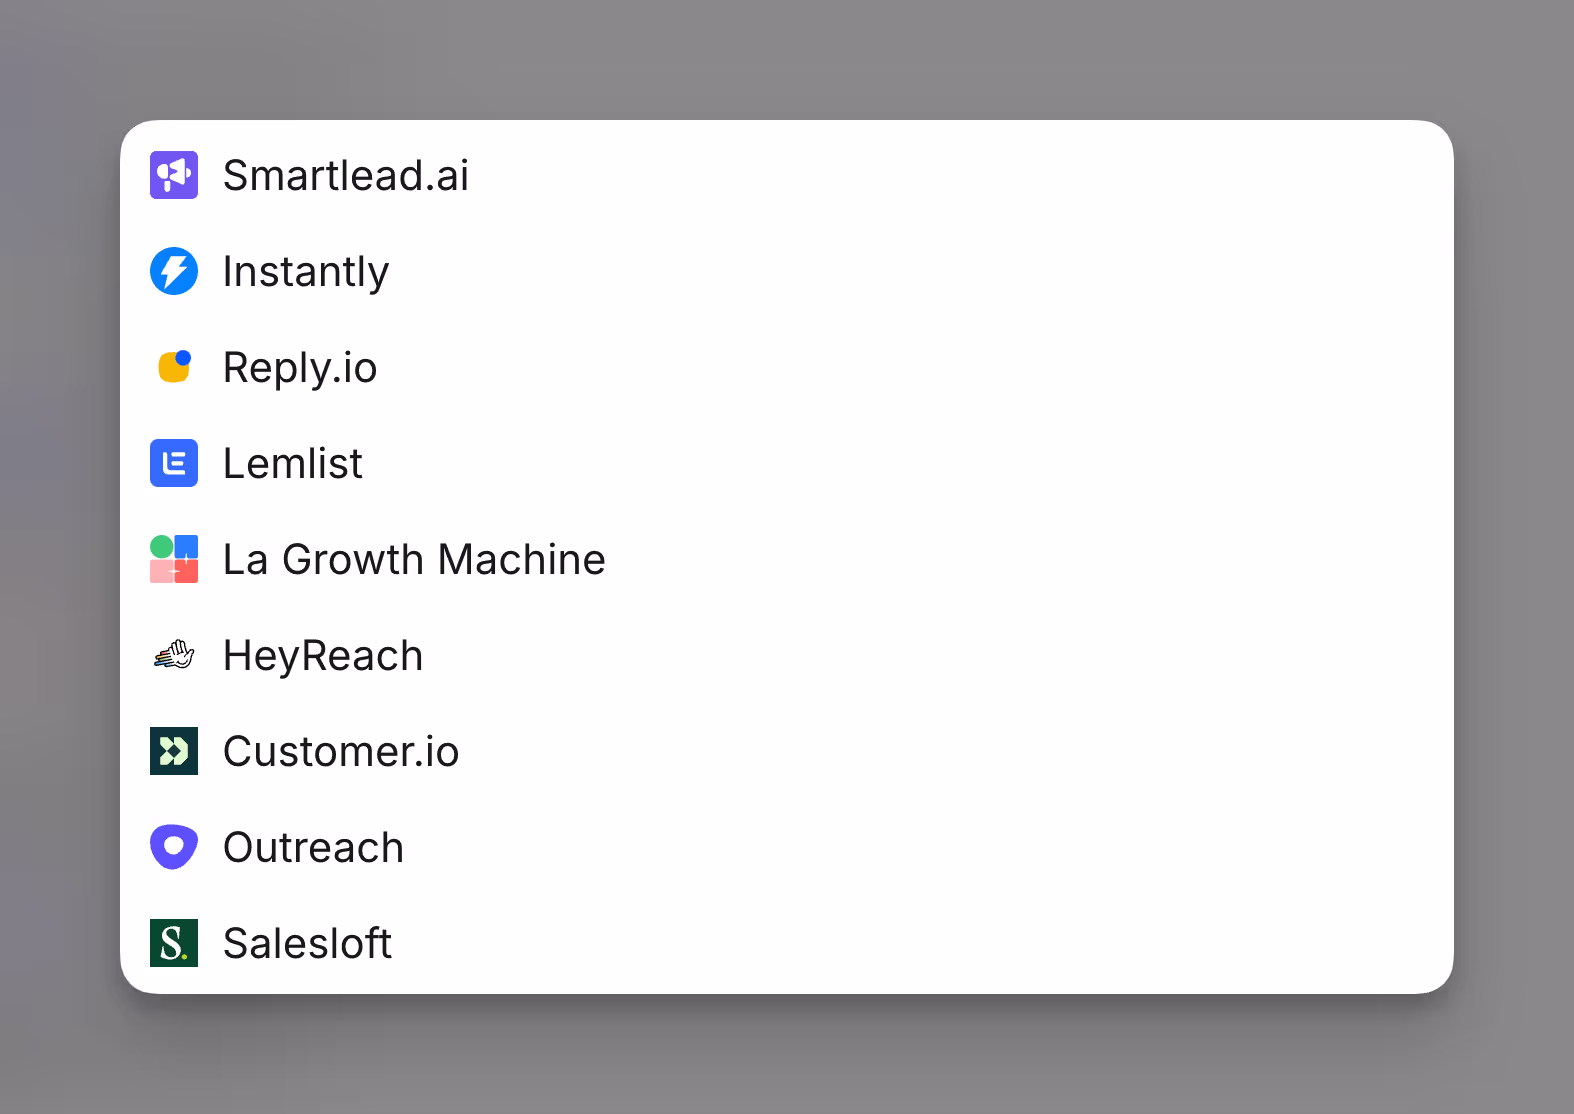
Step 2: Select your sequencer
Choose the sequencer you want to export your messages to from the list.
Note: Each sequencer has unique export requirements and settings. For details, refer to the notes on sequencer-specific settings below.
Step 3: Write your message(s)
Within the Message Drafting Panel, craft your messages.
Be mindful of your sequencer’s export settings to ensure compatibility.
Step 4: Configure field mappings
Click Continue to review and verify the field mappings for custom fields with your sequencer.
Tip: Some sequencers require fields to be pre-configured, while others allow you to create fields directly from within the action.
Step 5: Verify run settings and run the enrichment
Check your auto-update and conditional run-settings, as well as any other setting within your action to verify exporting.
Message drafting panel components
The Message Drafting Panel is composed of several key components that work together to help you create dynamic, personalized messages efficiently.
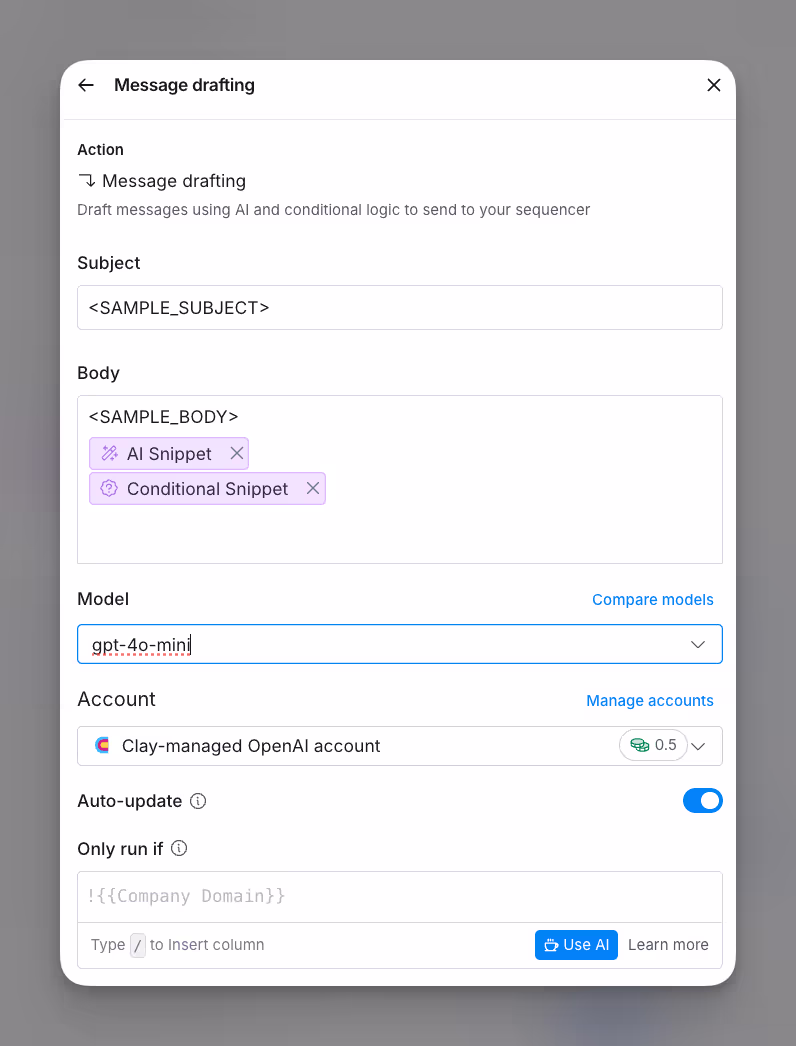
Subject line
- Enter your desired subject line in the Subject field.
Message body
- Write your message directly in the Body field.
- Use AI Snippets to generate suggestions or enhance your content.
- Add Conditional Snippets to include dynamic content based on specific conditions, such as field values or logical operators.
AI model and account settings:
- Select the desired AI model for drafting (e.g., gpt-4o-mini).
- Ensure the correct account is connected to access the AI functionality.
Run action settings
- Toggle Auto-update to refresh message drafts automatically with updated data.
- Configure the Only Run If condition to control when the action should execute (e.g., only if a specific field exists).
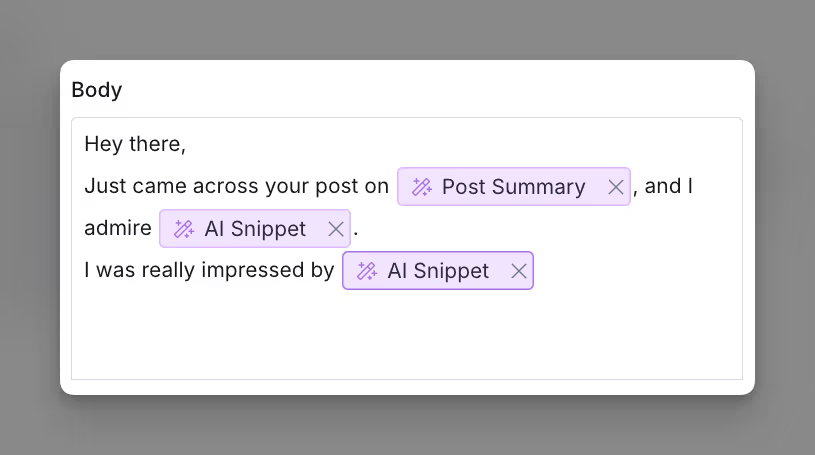
AI Snippets
Create dynamic, tailored content directly within your message drafter using AI snippets.
Conditional snippets
Conditional Snippets allow you to add dynamic logic to your messages, displaying specific content based on defined conditions.
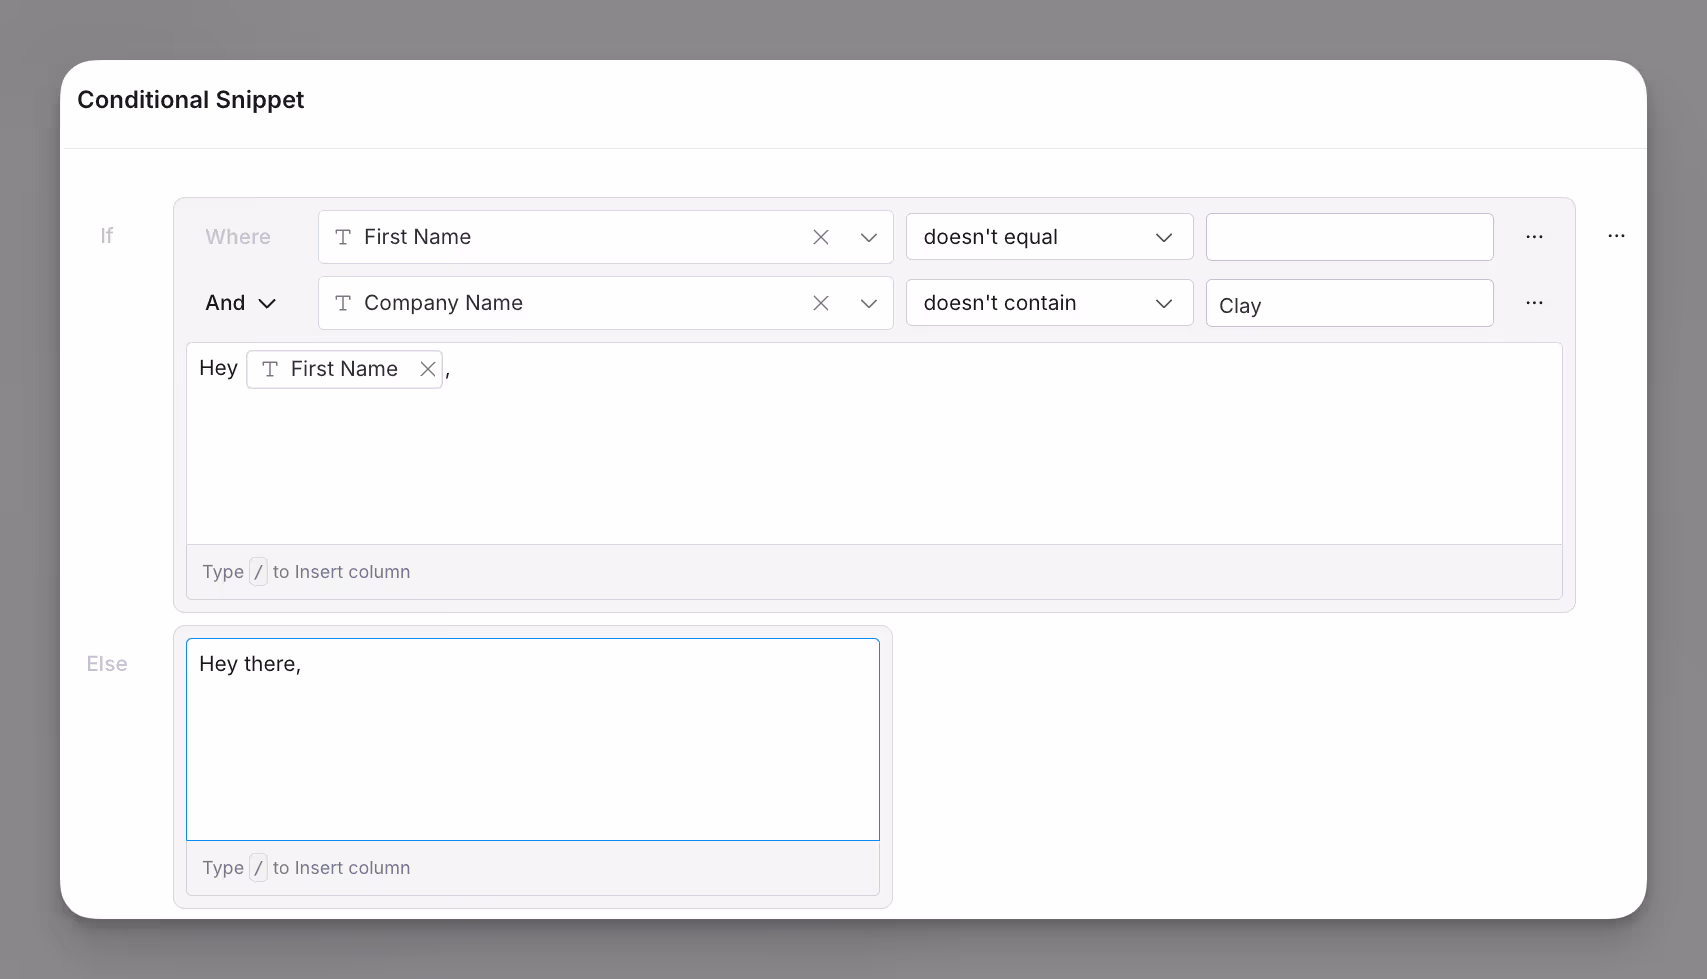
Key Features
- Conditional Logic: Define “if/else” conditions to display different content based on recipient-specific data, such as including a personalized greeting if a first name exists.
- Logical Operators: Combine multiple conditions using operators like AND (e.g., First Name exists AND Company Name does not include “Clay”) or OR.
- Comparison Operators: Compare data values (e.g., check if a field “equals,” “does not equal,” or “contains” specific information) to tailor your message logic.
- Custom Fields: Insert dynamic fields from your data for tailored messaging.
How to Use Conditional Snippets
- Insert a Conditional Snippet:
- In your message body, type
/to open the conditional snippet panel.
- In your message body, type
- Define Your Conditions:
- Use the Where fields to set conditions based on your data.
- Add multiple conditions using AND or OR to refine your logic branches.
- Example: Check if a field (
First Name) exists or if another field (Company Name) contains specific text.
- Set the “If” Output:
- Define the content that will appear if the conditions are met.
- Use placeholders to dynamically insert data (e.g.,
Hey {{First Name}},).
- Set the “Else” Output:
- Provide fallback content for cases where the conditions aren’t met (e.g.,
Hey there).
- Provide fallback content for cases where the conditions aren’t met (e.g.,
- Save and Test:
- Save your snippet and test it with sample data to verify that the correct content displays for both “if” and “else” scenarios.
Lemlist
Lemlist's custom fields support HTML. Note that message draft editor newlines get replaced with spaces so for new lines within Lemlist use <br> or <p> tags.
For more information on Lemlist’s actions, refer to the Lemlist documentation.
Smartlead
Smartlead's custom fields support HTML and newlines. You are able to create new custom fields from your Clay action panel.
For more information on Smartlead’s actions, refer to the Smartlead documentation.
Instantly
Smartlead's custom fields support HTML and newlines.
For more information on Instantly’s actions, refer to the Instantly documentation.
Outreach
Outreach's custom fields fully support HTML and newline characters.
We recommend reserving specific Prospect custom fields (e.g. custom10 to custom15) for Clay usage to avoid conflicts with other custom field data. You will have to manually map your messages to these custom fields.
For more information on Outreach’s actions, refer to the Outreach documentation.
Salesloft
Salesloft's custom fields do not support HTML or newlines.
Custom fields must be manually defined in Salesloft before they can be exported from Clay. You will have to manually map your messages to these custom fields.
For more information on Salesloft’s actions, refer to the Salesloft documentation.
Reply.io
Reply.io's custom fields support HTML. Use <br> or <p> tags for newlines.
Note that there is a default maximum of 50 custom variables in total.
For more information on Reply.io’s actions, refer to the Reply.io documentation.
HeyReach
HeyReach's custom fields only support alphanumeric characters.
For more information on Salesloft’s actions, refer to the Heyreach documentation.
La Growth Machine
La Growth Machine's custom attributes support HTML. Use <br> or <p> tags for newlines.
La Growth Machine supports a maximum of 10 custom attributes per lead. Each custom attribute can be up to 250 characters long.
For more information on La Growth Machine’s actions, refer to the La Growth Machine documentation.
Customer.io
Customer.io's attributes support HTML. Use <br> or <p> tags for newlines.
Each attribute has a maximum length of 250 characters.
For more information on Customer.io's actions, refer to the Customer.io documentation.
Explore other docs
Other popular resources
Join a cohort, learn Clay fast!
The faster way to master Clay. Sign in if you're enrolled in a cohort (current or past) or apply!
Hire GTME Talent
Find and connect with GTM talent who've demonstrated expertise in building advanced workflows